Monday, September 13, 2010

Curanto!


I religiously listen to The Splendid Table on NPR on Sundays.  Last week's episode was a rebroadcast and had a short clip about wood fire cooking, specifically a variety of wood fire cooking that involves a hole in the ground and no smoke.  Since smoke flavor is often overwhelming (and I think undesirable), I was intrigued.  Francis Mallmann shared this recipe for Curanto, a traditional dish from Patagonia, with Lynne Rossetto Kasper.  We dug a hole and began. 
I keep trying to throw those shoes away, but Cassady won't let me.
Garn helped by chewing some sticks and rolling in a dead bird.
Layer of rocks on the bottom.
The fire, burnt down, covered in rocks. 
A whole chicken, red potatoes, carrots, yams and squash. Seasoned with salt & pepper. If you make this meal, cut the veggies smaller than we did.
Wrap in an unwanted western shirt.
Cover in dirt. Wait 5 hours.
Curanto is hot, sweaty work at the end.
Bounty.
Served. Totally delicious and moist.

Friday, September 3, 2010

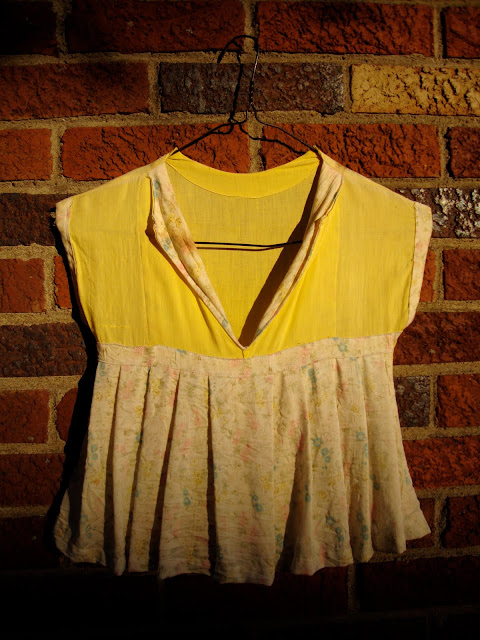
Little Dress Clothespin Bag


I’ve had this lovely vintage clothespin bag for a number of years. I covet it.   


When Mom bought a bad, standard clothespin bag at a home improvement store this summer I was first scandalized, then reminded that I can, in fact, make pretty, functional things.  I used the vintage bag as inspiration for this pattern. I made Mom’s bag out of upholstery fabric, since she wanted to be able to leave the bag outside  for the summer drying season.  The bag I make here is a lighter weight cotton. I think you can use whatever you want.  I contemplated outdoor fabric with grommets in the bottom for drainage.  The original vintage bag is a thin cotton and seems to have held up for 50 years.


You will need the pattern from Scribd.com, which I will upload this evening after Dovecake goes to bed. The bag uses 2 fabrics, one for the body of the dress and the other for the skirt, lapels and cuffs.

Cut:
Fabric A
2 Dress Pieces
1 Back lining
Fabric B
2 front lining, one reverse
1 belt
1 skirt 7.5x19
2 cuffs, 1 reverse

Pin together the necklines of the back lining and one of the dress pieces, right sides facing.  Do the same with the front linings, but also pin down the inner edges.  These pieces will make your lapels. 


 Sew the along the neckline of the back piece and the neckline and inner edges of the front piece with a ¼” seam. What you have now will look like this: 


Cut down the front of the dress in between the 2 inner lining seams. Turn and press these pieces.  Sew along the raw edges of linings to keep them from pulling up when your bag is in use.  The back of the front piece will look like this: 


Next you’re going to work on the skirt. Fold one long edge under ¼” and iron, then another ¼”   and iron and stitch in place to create your  hem. You can pleat it like it did, or, if you’re feeling frilly, you simply gather it.  Make sure you sew the bottom hem before you pleat or gather the skirt.  Fold each of the long edges of the belt under ¼” and iron.  Pin the belt onto the pleated skirt edge and pin like you would bias tape. Sew the belt to the skirt along the belt fold.  


Pin the skirt to the front piece making sure to center the middle pleat on the V created by your inner linings.  The bottom of your skirt should be an inch or so above the bottom of the dress piece.  You can also fold the longer edge of the cuff pieces under ¼” and iron and pin them onto the dress front at this point.  


Sew the cuffs along the folded side.  Sew the belt onto the dress along the top and bottom edges of the belt.  When all the embellishments are sewn onto the front of the dress you can pin the front and back of the dress together, right sides facing, along the sides.  Make sure your finished neck edges match up.  Sew along each side and then pin the bottom and sew.  Finish the edges with pinking shears or a zig zag stitch or a serger if you’re fancy.  I’m not. I wish I was.   

Turn your dress right side out and press the lapels down.  I like to sew along the back neck line and sew the lapels in place.  You might could use buttons to hold the lapels in place, if you’re into that sort of thing.  I didn’t feel like digging for buttons, so I sewed.  


I like to use a wire hanger in these things since they look more old-fashioned and cohesive with the dress bag.  Place on a hanger and fill with clothespins.  Ta-da! You’ve got a purdy bag for your clothes pins! 


Sunday, August 15, 2010

Tomato Fairy Upcycle

Back in April, when I was still largely pregnant, I found the most amazing Cynthia Rowley tomato print shell dress at Goodwill. It was a teeny-tiny size four with a busted zipper.  Since I am nowhere near a size four right now, I tore it apart to make Amelie a tomato fairy dress for the East Nashville Tomato Art Festival. This was the dress:

And this is the print.  Perfect, right?

The upcycled dress and bloomers:

And this is Squeakerton in the dress:
 I used the Prudent Baby Sweet Shirred Summer Dress pattern. Precious, huh?

Friday, August 6, 2010

How to Please Your Mother-in-Law

So we missed my mother-in-law's birthday last year.  A person might think that her husband would know his own mother's birthday.  I know the birthdates of everyone in my family and there are 11 of us.

Just saying.

Anyway...we needed to make up for last year's fail by doing something really lovely this year.  Accidentally getting pregnant and having a tiny dovecake put us on the right track and allowed us to make what turned out to be (in my MIL's words) "the best b-day present EVER!" It was awfully precious.

All a person needs for this personalized gift is some construction paper, scissors, scotch tape, a digital camera, Walgreens, a 3 slot picture frame and a gorgeous child to model.  We took 2 versions of the pictures. 

This one, for emailing and posting on her facebook page on her birthday:


And these three to put in the 3 slot picture frame and send up to Ohio:

This method could be used for any number of occasions, perhaps with themed outfit or scenery.  If I was really motivated I would do whole scenes like the mama at Mila's Daydreams.  She's very good.

Monday, June 21, 2010

Name Pennant Garland

I searched everywhere on the internet to find a pattern for a pennant garland that is sturdy enough to survive years of use.  There are many patterns for disposable garlands and several patterns that need to be purchased for sturdier garlands with square flags, but none of these were acceptable to me.  I made up my own plan.  Should you want to make a garland for your dumpling, here it is:

The curtains in Amelie's room are from IKEA and had to be hemmed up 14 inches to work in our nursery.  This gave me a lot of extra fabric to use as the backing of the pennants.  I used fabric remnants for the letters.  You'll also need fusible interfacing, double sided adhesive interfacing (like Steam-a-Seam) and bias tape for the rope part of the garland.

Draw a pattern for the triangles.  I made mine 7 inches wide and 10 inches long, which included space for the hems.  Cut twice as many triangles as you will want in your finished garland. Pair up the triangles into front and back pieces.  I ironed fusible interfacing onto the front half of each triangle. 

To make the letters use a word processing program and print your kiddo's name in a font you like.  Formatting the font so that it prints just the outline will save you ink.  I used Microsoft Word Cooper Black in some huge size like 350.  Your life will be much easier if you iron double sided adhesive interfacing onto the fabric you're going to use for the letters. Cut out the letters and iron them onto the front panel of your triangles.  I sewed around the letters using a zigzag stitch. 
After all your letters are adhered and outlined in stitching, sew the 2 faces of each pennant together along the long edges, leaving the top open. Turn the triangles right side out, poke out the point and iron the whole deal to make it flat and properly shaped.  Trim the top edge if there are a bunch of strings and such hanging out.  Open up the bias tape and pin each triangle in place.  Sew along the bias tape using a straight stitch to hold the triangles in place.  I went back and zigzagged the length as well, for purely cosmetic reasons. 

Tah dah!  You're done.  Nice garland.

To Start.

All babies look stunning in a bonnet. Really, the first 4 or 5 years of life are the only times that a person can wear a bonnet and not look ridiculous or like a member of some conservative religious sect.  I made Squeakerton this bonnet using the Prudent Baby Reversible Bonnet Tutorial.  I did have to cut the pattern down about an inch all the way around so that it would fit my dovecake's head.  Tonight, when it stops feeling like a sauna outside we are going to the fabric store to get snaps for the snap gun so that she can have a tidy Girl-scout-esque tie underneath her sweet chin. Precious.

Behind Amelie's head in the bonnet picture you can see a burp cloth, which is flannel and terrycloth and the greatest, most absorptive option available to us.  The cloths are totally easy to make and well worth your time.  They're the perfect size.  Again, Prudent Baby.  I'm addicted.


I also made this nursing cover, using the Prudent Baby tutorial.  I had the lovely vintage fabric in my stash.  Now I need to practice using the cover...

Sunday, June 20, 2010

My Squeakerton.

This person made her grand entrance 3 weeks ago.  She was a tiny speck of girl. My world was rocked.  She's perfect.  I've been filling in time between breastfeeding and company with various crafty endeavors and HBO series.  Sewing helps me feel like I'm creating something, even as I'm trapped in the house, imprisoned by heat, humidity and a 2.5 hour feeding cycle. 

This photo is by Robin Dodd.